Azure Active Directory single sign-on (SSO) integration with ServiceNow
- Control in Azure AD who has access to ServiceNow.
- Enable your users to be automatically signed-in to ServiceNow with their Azure AD accounts.
- Manage your accounts in one central location: the Azure portal.
Pre-Requisites
- An Azure AD subscription. If you don't have a subscription, you can get a free account.
- A ServiceNow single sign-on (SSO) enabled subscription.
- For ServiceNow, an instance or tenant of ServiceNow supports Calgary, Kingston, London, Madrid, New York, Orlando, Paris and San Diego versions or later.
- For ServiceNow Express, an instance of ServiceNow Express, Helsinki version or later.
- The ServiceNow tenant must have the Multiple Provider Single Sign On Plugin enabled.
- For automatic configuration, enable the multi-provider plugin for ServiceNow.
- To install the ServiceNow Agent (Mobile) application, go to the appropriate store, and search for the ServiceNow Agent application. Then download it.
Add ServiceNow from the gallery
To configure the integration of ServiceNow into Azure AD, you need to add ServiceNow from the gallery to your list of managed SaaS apps.
- Sign in to the Azure portal by using either a work or school account, or by using a personal Microsoft account.
- In the left pane, select the Azure Active Directory service.
- Go to Enterprise Applications, and select All Applications.
- To add new application, select New application.
- In the Add from the gallery section, enter ServiceNow in the search box.
- Select ServiceNow from results panel, and then add the app. Wait a few seconds while the app is added to your tenant.
Configure and test Azure AD SSO for ServiceNow
Configure and test Azure AD SSO with ServiceNow by using a test user called B.Simon. For SSO to work, you need to establish a link relationship between an Azure AD user and the related user in ServiceNow.
To configure and test Azure AD SSO with ServiceNow, perform the following steps:
- Configure Azure AD SSO to enable your users to use this feature.
- Create an Azure AD test user to test Azure AD single sign-on with B.Simon.
- Assign the Azure AD test user to enable B.Simon to use Azure AD single sign-on.
- Configure Azure AD SSO for ServiceNow Express to enable your users to use this feature.
- Configure ServiceNow to configure the SSO settings on the application side.
- Create a ServiceNow test user to have a counterpart of B.Simon in ServiceNow, linked to the Azure AD representation of the user.
- Configure ServiceNow Express SSO to configure the single sign-on settings on the application side.
- Test SSO to verify whether the configuration works.
- Test SSO for ServiceNow Agent (Mobile) to verify whether the configuration works.
Configure Azure AD SSO
Follow these steps to enable Azure AD SSO in the Azure portal.
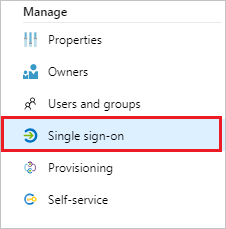
- In the Azure portal, on the ServiceNow application integration page, find the Manage section. Select single sign-on.
- On the Select a single sign-on method page, select SAML.
- On the Set up single sign-on with SAML page, select the pen icon for Basic SAML Configuration to edit the settings.

4. In the Basic SAML Configuration section, perform the following steps:
a. In Sign on URL, enter one of the following URL patterns:
Sign on URL
https://<instancename>.service-now.com/navpage.dohttps://<instance-name>.service-now.com/login_with_sso.do?glide_sso_id=<sys_id of the sso configuration>
Note
Please copy the sys_id value from Configure ServiceNow section which is explained later in the tutorial.
b.
In Identifier
(Entity ID), enter a URL that uses the following pattern: https://<instance-name>.service-now.com
c. For Reply URL, enter one of the following URL patterns:
Reply URL
https://<instancename>.service-now.com/navpage.dohttps://<instancename>.service-now.com/consumer.do
d.
In
Logout URL, enter a URL that uses the following pattern: https://<instancename>.service-now.com/navpage.do
Note
If "/ " is added in the Identifier value, please remove that manually.
Note
These values aren't real. You need to update these values with the actual sign-on URL, Reply URL, Logout URL and identifier, which is explained later in the tutorial. You can also refer to the patterns shown in the Basic SAML Configuration section in the Azure portal.
5. On the Set up single sign-on with SAML page, in the SAML Signing Certificate section, find Certificate (Base64).
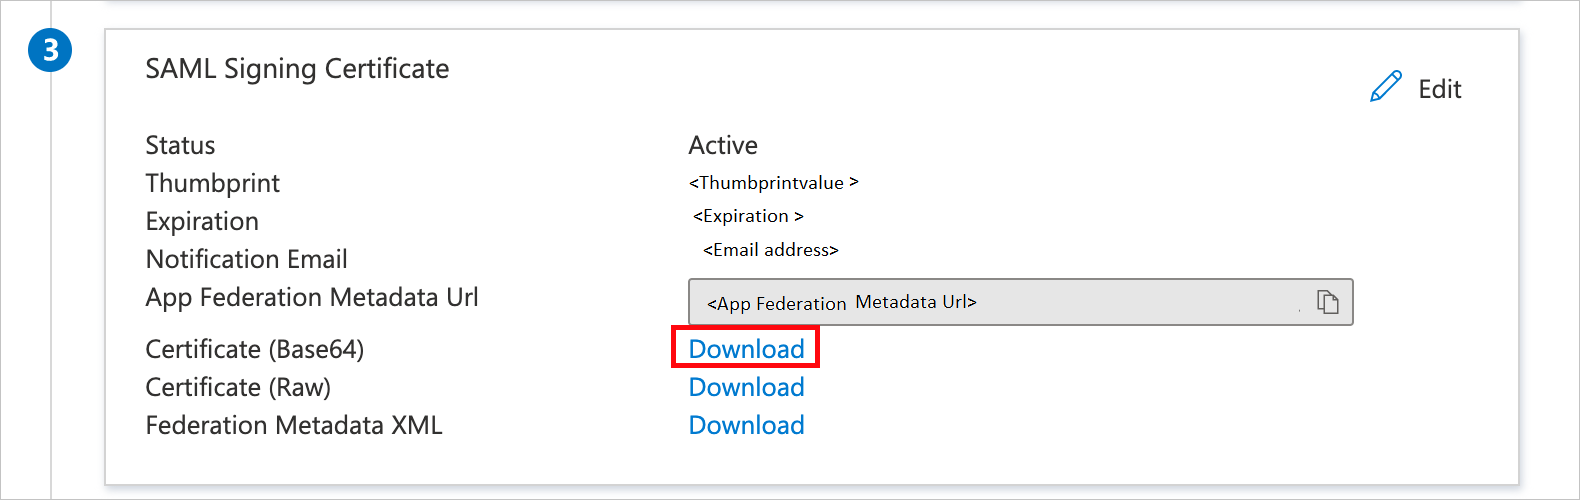
a. Select the copy button to copy App Federation Metadata Url, and paste it into Notepad. This URL will be used later in the tutorial.
b. Select Download to download Certificate(Base64), and then save the certificate file on your computer.
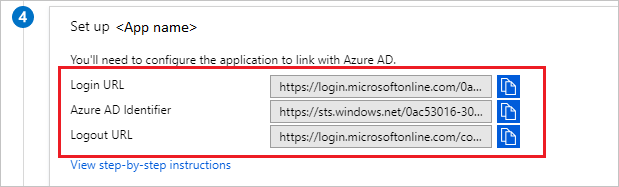
6. In the Set up ServiceNow section, copy the appropriate URLs, based on your requirement.
Create an Azure AD test user
In this section, you'll create a test user, called B.Simon, in the Azure portal.
- From the left pane in the Azure portal, select Azure Active Directory > Users > All users.
- Select New user at the top of the screen.
- In the User properties, follow these steps:
- For Name, enter
B.Simon. - For User name, enter the username@companydomain.extension. For example,
B.Simon@contoso.com. - Select Show password, and then write down the value that's shown in the Password box.
- Select Create.
Assign the Azure AD test user
this section, you'll enable B.Simon to use Azure single sign-on by granting access to ServiceNow.
- In the Azure portal, select Enterprise Applications > All applications.
- In the applications list, select ServiceNow.
- In the app's overview page, find the Manage section, and select Users and groups.
- Select Add user. In the Add Assignment dialog box, select Users and groups.
- In the Users and groups dialog box, select B.Simon from the users list, and then choose Select.
- If you are expecting a role to be assigned to the users, you can select it from the Select a role dropdown. If no role has been set up for this app, you see "Default Access" role selected.
- In the Add Assignment dialog box, select Assign.
Configure Azure AD SSO for ServiceNow Express
In the Azure portal, on the ServiceNow application integration page, select single sign-on.